🚀 First Steps in Perforce: A Beginner's Guide
Welcome to your journey with Perforce! This guide will walk you through the essential tasks you'll perform using the P4V client. Let's dive in!
📋 Table of Contents
- Creating a Workspace
- Managing .p4ignore Files
- Navigating Your Workspace
- Editing Files
- Adding Files
- Deleting Files
- Working with Streams
- Best Practices
Official Perforce Video: Perforce Helix Core Beginner’s Guide: How to Create a Workspace
🏗️ Creating Your Workspace
Before you can start working with files, you need to set up your workspace. A workspace is your personal working area where you interact with files from the Perforce server.
Steps to Create a Workspace:
-
Open P4V: Launch the Perforce Visual Client
-
Connect to the Server:
- If not already connected, go to
Connection > Connect to Server - Enter your server address, username, and password
- If not already connected, go to
-
Create a New Workspace:
- Go to
Connection > New Workspace - Or use the shortcut (when inside the Workspaces context window):
Ctrl + N(Windows) orCmd + N(macOS)
- Go to
-
Configure Workspace Settings:
- Name: Enter a unique name for your workspace (e.g., "Username_ProjectName_Machine")
- It is recommended to begin all workspaces with your
abc123username
- It is recommended to begin all workspaces with your
- Root: Choose a local directory for your workspace files
- Stream: Select the appropriate stream for your project (e.g., "//depot/main")
- Description: Add a brief description of your workspace's purpose
- Name: Enter a unique name for your workspace (e.g., "Username_ProjectName_Machine")
-
Set Workspace View:
- This defines which parts of the depot you want in your workspace
- For most users, the default view based on the selected stream is sufficient
-
Advanced Options:
- Configure options like line-ending settings or submit options as needed
- Tick on
Modtimeunder Advanced tab - Tick on
Rmdirunder Advanced tab
- Tick on
- Configure options like line-ending settings or submit options as needed
-
Create Workspace:
- Click 'OK' to create your workspace
-
Initial Sync:
- After creating the workspace, you'll be prompted to sync files
- This downloads the current versions of files to your local workspace
Follow your team's naming convention for workspaces. A common format is "UserName_MachineName_ProjectName".
The specific options and appearance may vary slightly depending on your Perforce server configuration and P4V version.
🛠 Managing .p4ignore Files
.p4ignore files help manage which files are versioned in your project. This is crucial for game development, where you often have build directories, temporary files, or third-party libraries that shouldn't be in version control.
Setting Up .p4ignore Support
-
Enable .p4ignore Support:
-
Open Command Prompt as administrator
-
Type
setx P4IGNORE .p4ignoreand press Enter -
Alternative Method: Edit System Environment Variables:
- Search your computer for an option to 'Edit the system environment variables'
- Under 'System variables', click 'New'
- For 'Variable name', enter
P4IGNORE - For 'Variable value', enter
.p4ignore - Click 'OK' on all windows to save the changes
- Restart any open command prompts or applications for the change to take effect
-
-
Create a .p4ignore File:
- In your workspace root, create a file named
.p4ignore - Add patterns for files to ignore, for example:
- In your workspace root, create a file named
# Ignore temporary files
*.tmp

# Ignore build directory
build/

# Ignore all files in temp directories
temp/**
For Unity or Unreal projects, check if a template .p4ignore file is provided in your depot. It's a great starting point! If not, we provide a default Universal .p4ignore file that can be used for most game design and virtual production projects.
🗺 Navigating Your Workspace
Your workspace is your local copy of files from the server. Here's how to navigate it efficiently:
👀 Viewing Your Files
-
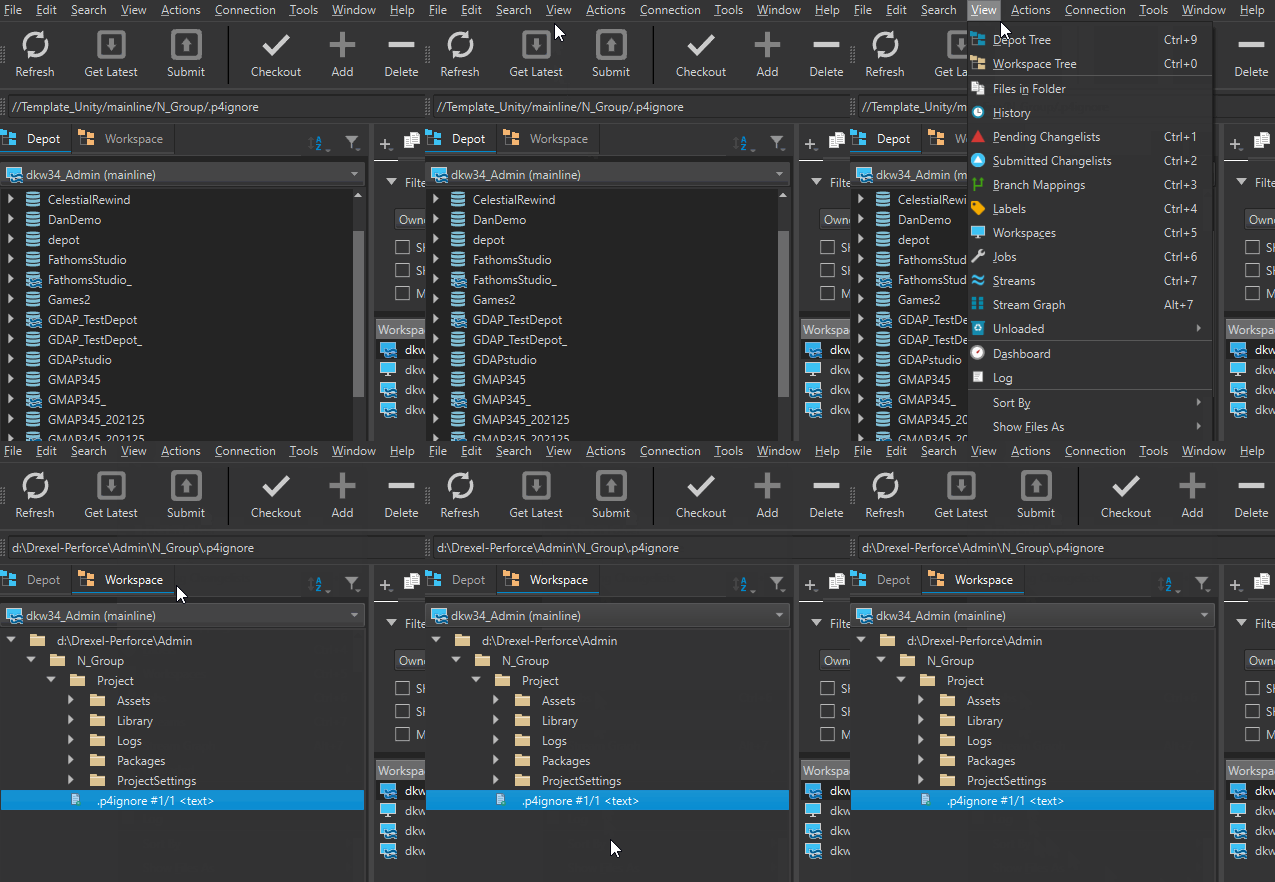
Open the Workspace Tree tab:
- Menu:
View > Workspace Tree - Shortcut:
Ctrl + 0(Windows) orCmd + 0(macOS)

- Menu:
Official Perforce Video: Perforce Helix Core Beginner’s Guide: Submitting, Syncing, and Managing File Changes
🔄 Syncing to the Latest Version
-
Right-click your workspace and choose Get Latest Revision
-
Shortcut:
Ctrl + Shift + G(Windows) orCmd + Shift + G(macOS)
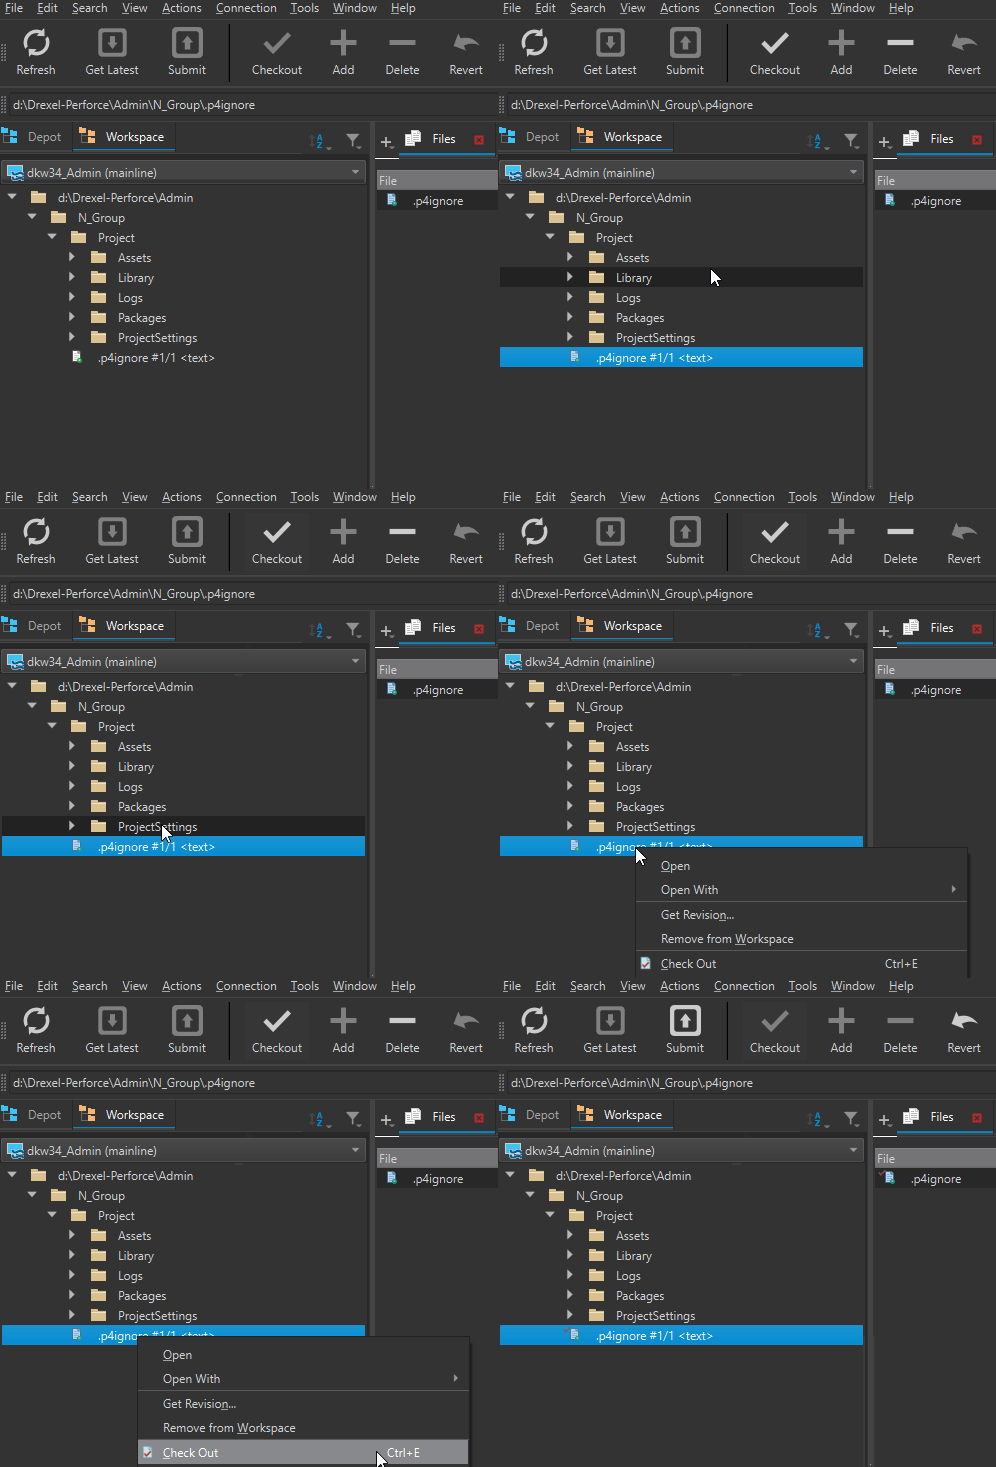
🔒 Checking Out Files
-
Right-click a file and select Check Out
-
Shortcut:
Ctrl + E(Windows) orCmd + E(macOS)
📤 Submitting Changes
-
Go to the Pending tab
-
Right-click your changelist and select Submit
-
Enter a detailed description
-
Click Submit

✏️ Editing Files
- Check Out: Right-click the file and select 'Check Out'
- Edit: Make your changes using your preferred editor
- Submit: Right-click the edited file and select 'Submit'
Always provide a clear, descriptive message when submitting changes!
📁 Adding Files
-
Create or Place Files in your workspace
-
In P4V, right-click and select Mark for Add
-
Submit the changelist to add files to the depot

Official Perforce Video: Perforce Helix Core Beginner’s Guide: Undoing Changes and Fixing Deleted Files
🗑 Deleting Files
Always use P4V to delete files. Don't delete directly from your file system!
- Locate Files: In the Depot tab, find the file(s) you want to delete
- Mark for Deletion: Right-click and choose "Delete"
- Submit the Change:
- Go to the Pending tab
- Right-click the changelist and select "Submit"
- Enter a description explaining the deletion
- Verify: Check both the Depot tab and your local workspace to ensure the files are gone
If files persist locally after deletion, try refreshing your workspace or syncing to the latest revision.
🌊 Working with Streams
Streams are purpose-defined branches that make managing changes easier.
-
View Stream Structure:
- Open the Stream Graph tab:
View > Stream GraphorAlt + 7
- Open the Stream Graph tab:
-
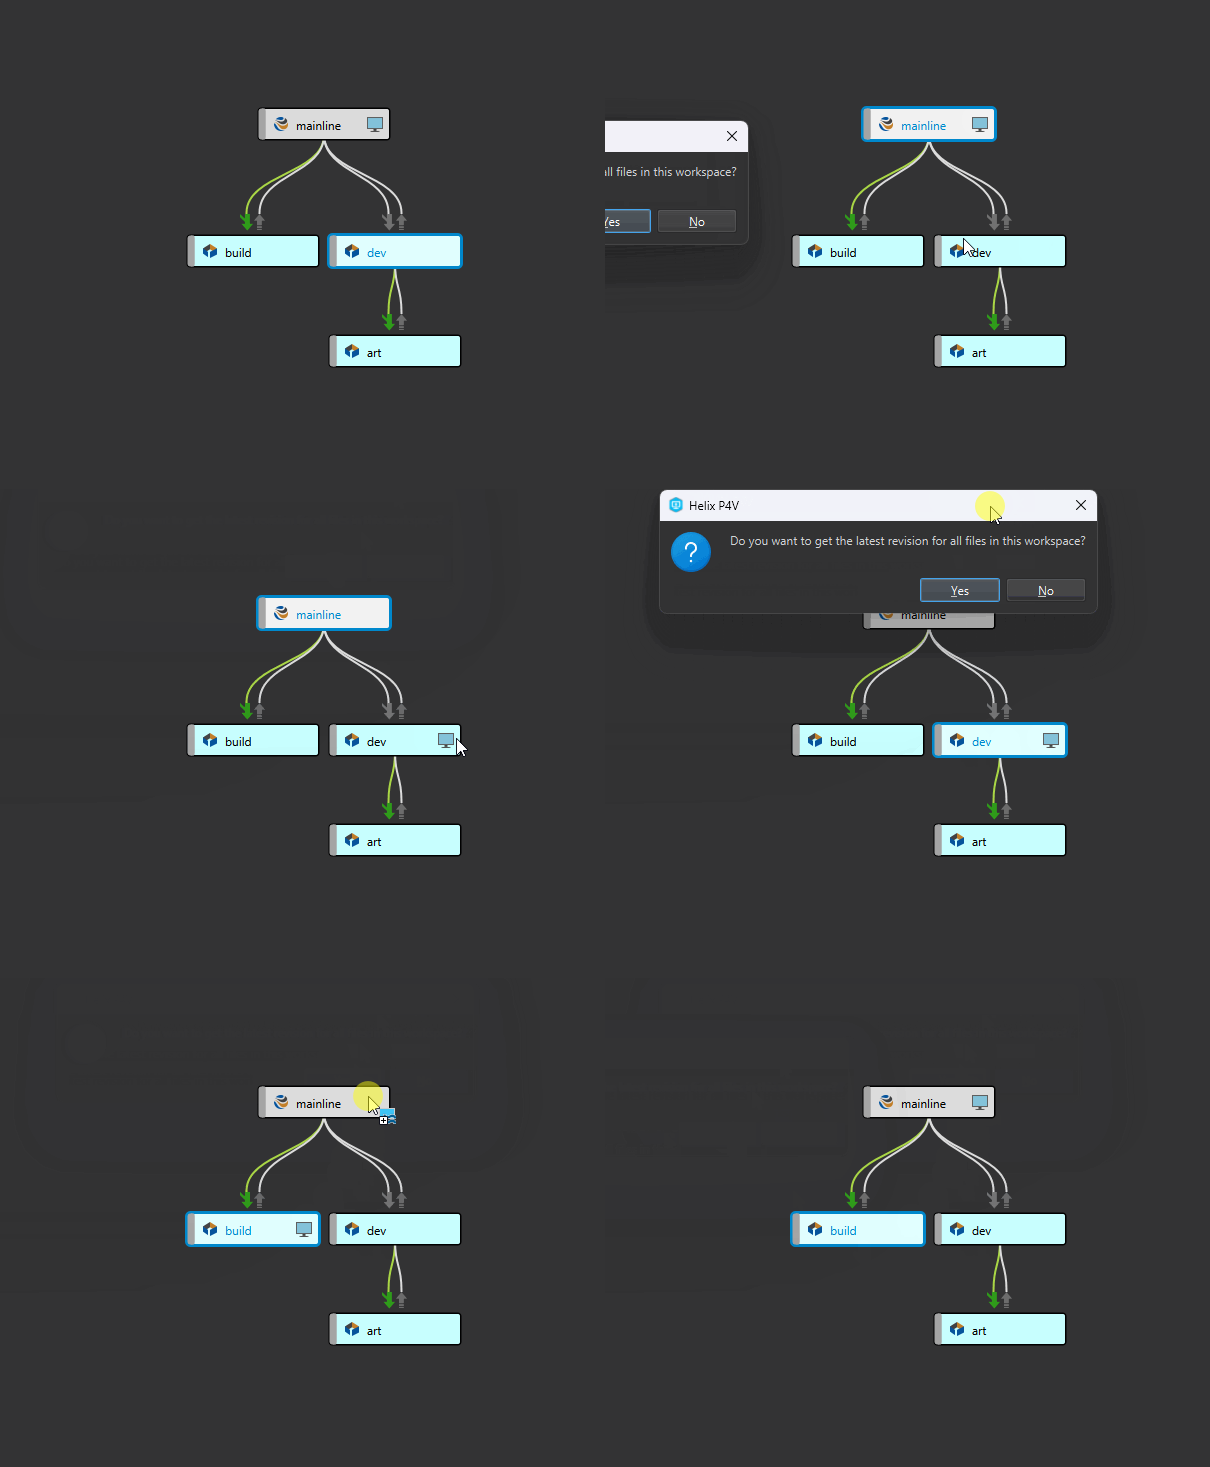
Switch Streams:
- Right-click your workspace, choose "Edit Workspace"
- Select the desired stream
- Or drag the computer icon in the Stream Graph

-
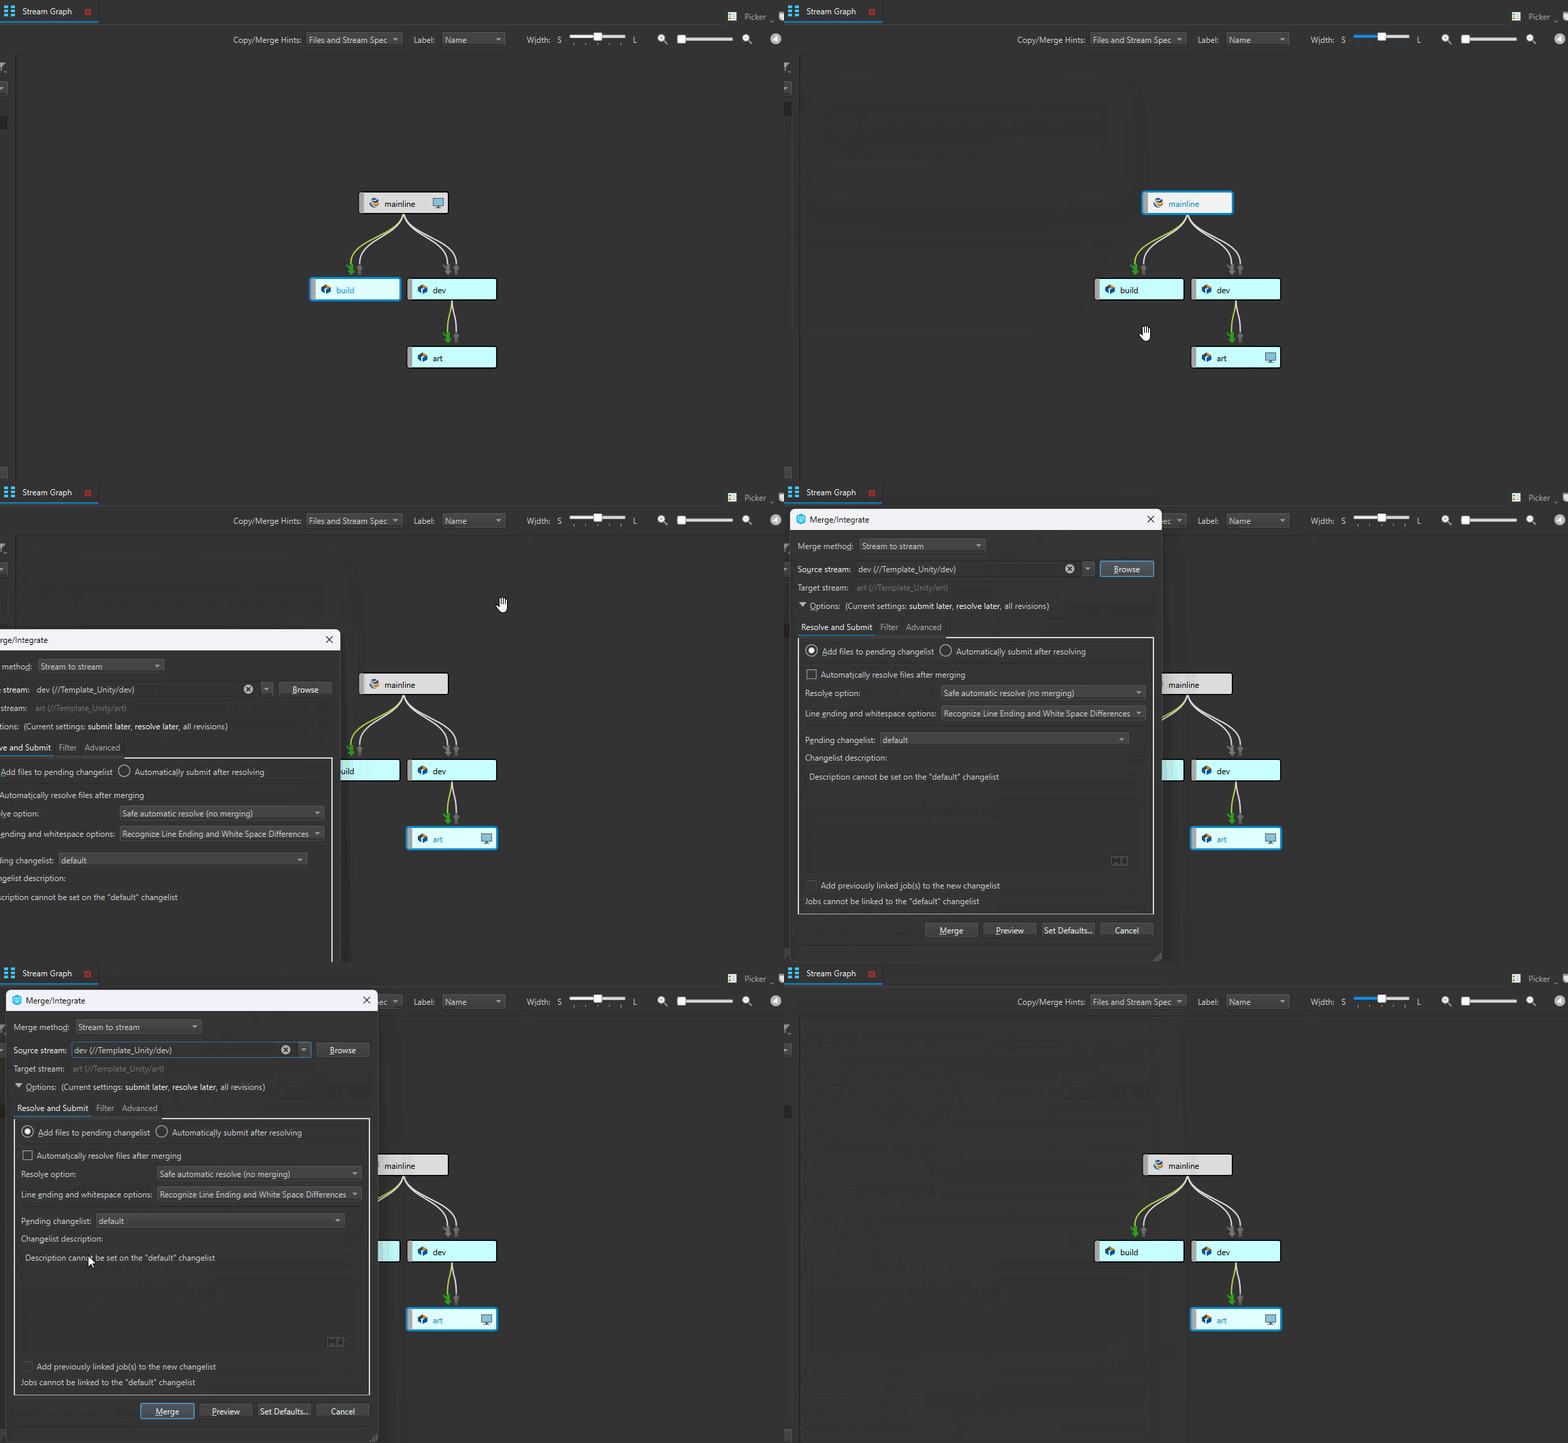
Merge Changes:
- Right-click the target stream and select 'Merge/Integrate'
- Follow prompts to resolve conflicts

💡 Best Practices
- Sync Frequently: Get the latest version before starting work
- Check Out Wisely: Only check out necessary files
- Review Changes: Use "Revert If Unchanged" before submitting
- Descriptive Submissions: Always provide clear commit messages
- Communicate: Keep your team informed about significant changes
- Regular Syncs: Update your workspace often to minimize conflicts
Check out the Official Helix Core Documentation for in-depth information and advanced techniques!
Visit the Perforce YouTube Channel for video tutorials and references!