🚀 Perforce Installation Guide for Drexel University
Table of Contents
- # Connecting to Drexel VPN
- # P4V Client Installation
- # Setting Up Perforce Streams
- # Configuring Your Workspace
Connecting to Drexel VPN
Connecting to the Drexel VPN is mandatory before accessing the Perforce server. Ensure you complete this step before proceeding with any Perforce-related tasks.
🔒 Step 1: Install Cisco AnyConnect
- If you haven't already, download and install Cisco AnyConnect from Drexel's Software Center
- Follow the installation prompts to complete the setup
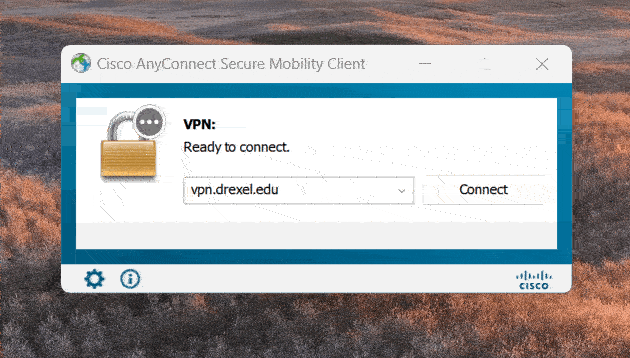
🌐 Step 2: Connect to Drexel VPN
- Open Cisco AnyConnect
- In the connection field, enter:
vpn.drexel.edu - Click "Connect"
- Enter your Drexel username and password when prompted
- If required, complete the Duo two-factor authentication
Keep Cisco AnyConnect running while you work with Perforce. If you disconnect, you'll lose access to the Perforce server.
For detailed instructions and troubleshooting, visit Drexel's VPN Guide
P4V Client Installation
P4V is the Perforce Visual Client that provides a graphical interface for managing your files and repositories (depots) in Perforce.
📥 Step 1: Download
- Visit the official Perforce downloads page: Download Helix Visual Client (P4V)
- Select the version of P4V for your operating system (Windows, macOS, Linux)
- Click the download button and save the installer to your computer
Make sure to download the latest version to ensure you have all the newest features and security updates!
💻 Step 2: Install
- Locate the downloaded installer and double-click to start the installation process
- Follow the on-screen instructions:
- Accept the license agreement
- Continue with the default installation settings (unless you have specific preferences)
- Complete the installation
No initial configuration is needed during the install process.
- You may choose to optionally install Helix Core Apps. Installing most apps is recommended.
- Only those with administrative access need P4Admin (Administration Tool)

Setting Up Perforce Streams
Perforce Streams provide a structured way to manage branches in your projects, making it easier to handle merges and integrations.
🔐 Step 1: Accessing P4V
Ensure you're connected to the Drexel VPN before proceeding. If you haven't connected yet, refer to the # Connecting to Drexel VPN section above.
- Launch P4V from your applications or programs list
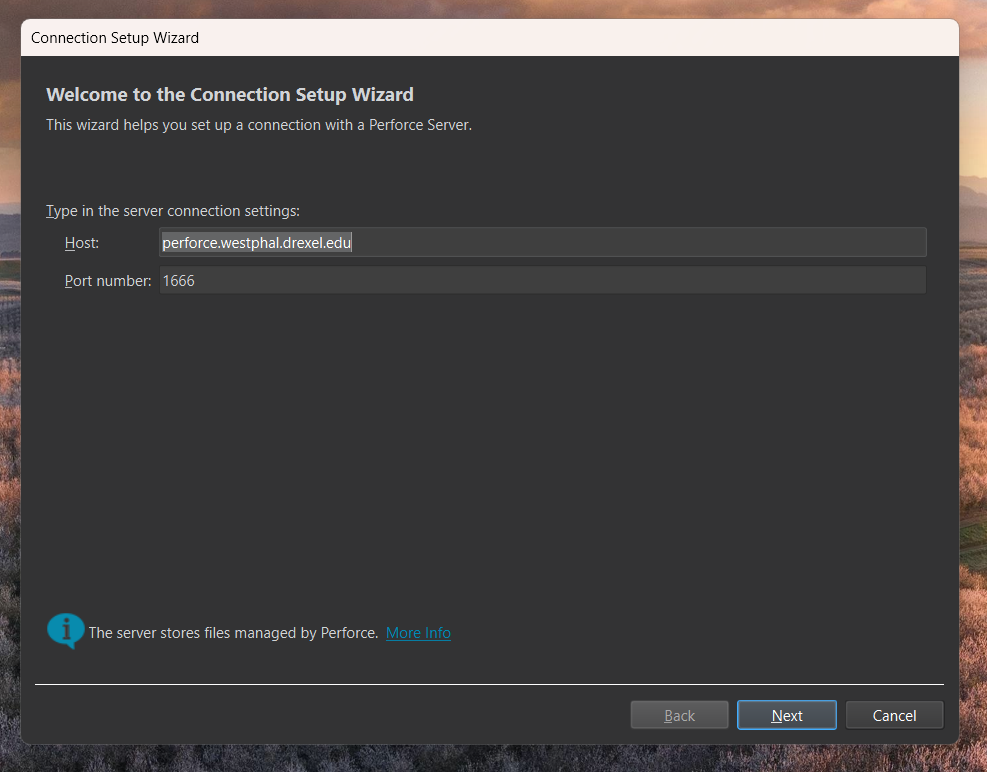
- Connect to the Perforce server:
- Enter the server address:
perforce.westphal.drexel.edu:1666 - Log in with your provided credentials (username and password)
- Username is your Drexel username:
abc123 - Default passwords for new users are either
ChangeMe123!orTempPass123!
- Username is your Drexel username:
- Enter the server address:
🏗️ Step 2: Creating a Stream Depot
Most course-related and project-specific depots are pre-established. If you need a new depot, please contact your Professor, Team Lead, or the Perforce administrator.
For Perforce administrators:
- In the P4V Admin interface, right-click on the Depots area and select New Depot...
- Choose Stream for the Depot Type
- Name your depot (e.g., "GameDevProjects")
- For Unity projects, prefix with
N_(e.g.,N_GameDevProjects) - For Unreal projects, prefix with
R_(e.g.,R_GameDevProjects)
- For Unity projects, prefix with
- Provide a brief description
- Retain default settings for other properties
- Click 'OK' to create the depot
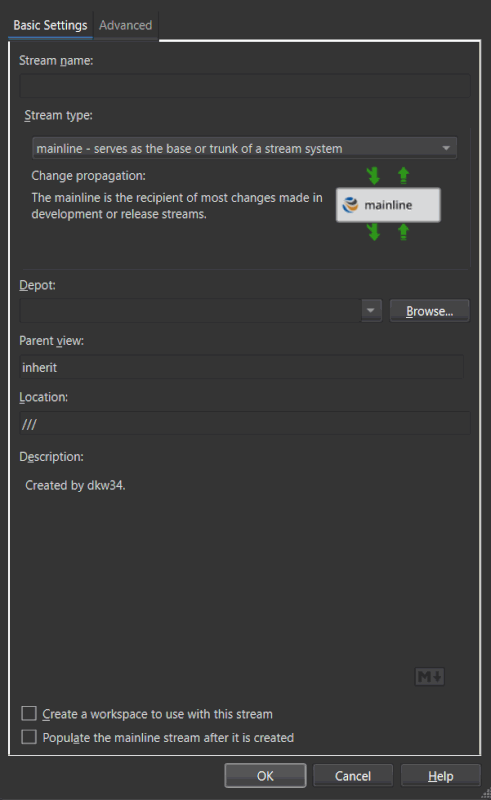
🌊 Step 3: Creating Your First Stream
- Navigate to the Streams tab (View > Streams or Ctrl/Cmd + 7)
- Right-click in the window and select New Stream...
- Select Mainline as the stream type
- Name your stream (e.g.,
main) and provide a description - Click 'OK' to create the stream
After creating the mainline, set up additional streams for a typical project structure:
- Development Stream (
//depot/mainline/dev) - Art Asset Integration Stream (
//depot/mainline/dev/art) - Build (Release) Stream (
//depot/mainline/build)